hybrid cache 적용기(local + global)
CaffeineCache + RedisCache
hybrid cache 적용기(local + global)
캐시를 도입해야하는 상황이 올때, local cache 혹은 global cache(redis)로 간단히 문제를 해결할 수 있습니다.
global cache(Redis)만 써봤을 때 느꼈던 한계점은 아래와 같습니다.
- Redis Hit이라도 네트워크 왕복 시간 존재
- Redis 서버 이슈가 곧 서비스 이슈로 직결
- TTL을 짧게 가져가도 부하가 Redis에 몰리는 현상
위를 해결하고자 local cache만을 사용한다면 또 아래의 문제에 부딪히게 됩니다.
- Local Cache는 빠르고 장애에 강하지만 서버마다 데이터가 다를 수 있어서 일관성(Consistency) 문제 발생
- 특히, 데이터 업데이트가 잦은 경우엔 정말 위험할 수 있음
이런 두 문제를 해결하기 위해 local + global 형태의 hybrid cache 구조를 적용하여 보았습니다.
local cache
먼저 springboot에서 CaffeineCache를 활용하여 local cache를 구현한 sample입니다.
kotlin, springboot3.x기준으로 설명합니다.
전체 sample은 github-sample를 참조해주세요.
gradle
spring cache 및 caffeine를 gradle에 로드합니다.
1
2
implementation("org.springframework.boot:spring-boot-starter-cache")
implementation("com.github.ben-manes.caffeine:caffeine")
CacheConfig
Spring에서 사용할 CacheManager에 CaffeineCacheManager를 적용합니다.
@EnableCaching를 붙혀줌으로써 springcache를 활성화해줍니다.
1
2
3
4
5
6
7
8
9
10
11
12
13
14
15
16
17
18
19
20
21
22
23
24
25
26
27
28
import com.github.benmanes.caffeine.cache.Caffeine
import org.springframework.cache.CacheManager
import org.springframework.cache.annotation.EnableCaching
import org.springframework.cache.caffeine.CaffeineCacheManager
import org.springframework.context.annotation.Bean
import org.springframework.context.annotation.Configuration
import java.util.concurrent.TimeUnit

@Configuration
@EnableCaching
class CacheConfig {

    @Bean
    fun caffeineConfig(): Caffeine<Any, Any> {
        return Caffeine.newBuilder()
            .expireAfterWrite(100, TimeUnit.SECONDS)
            .maximumSize(1000)
            .recordStats()
    }

    @Bean
    fun cacheManager(caffeine: Caffeine<Any, Any>): CacheManager {
        return CaffeineCacheManager().apply {
            setCaffeine(caffeine)
            isAllowNullValues = false // 캐시에 null 안 넣게 설정 (선택)
        }
    }
}
@Cacheable 적용
@Cacheable은 메서드 실행 결과를 캐시 저장소에 저장해두고, 같은 파라미터로 다시 호출될 경우, 메서드를 실행하지 않고 캐시된 결과를 반환해주는 기능을 제공합니다.
1
2
3
4
5
6
@Cacheable(cacheNames = ["productByName"], key = "#name")
fun getProductsByName(name: String): List<ProductInfo> {
    println("db 조회 getProductsByName")
    val products = productRepository.getProductsByName(name).orEmpty()
    return products.map { it.toInfo() }
}
cacheNames: 사용할 캐시 이름을 지정합니다.- 여기서는 productByName이라는 이름의 캐시 공간을 사용합니다.
- CacheManager에서 productByName이라는 이름으로 캐시를 관리합니다.
key: 캐시 저장 시 사용할 키 값을 지정합니다.- 여기서는 #name을 키로 사용합니다.
- 즉, 메서드 파라미터 name의 값을 기반으로 캐시합니다.
데이터는 아래와 같은 형식으로 저장되어 확인 가능합니다.
1
2
3
4
5
6
7
8
9
10
11
12
13
14
{
  "productByName": {
    "A": [
      {
        "name": "A",
        "price": 1.00
      },
      {
        "name": "A",
        "price": 1.00
      }
    ]
  }
}
정리하면, “입력된 상품명(name)을 키로 삼아, 해당 상품 목록을 productByName 캐시에 저장하고, 같은 이름으로 조회할 때는 캐시에서 바로 반환한다” 라고 이해할 수 있습니다.
cache stat
local cache의 hitcount, misscount, hitrate등을 통계로도 뽑아볼 수 있습니다.
1
2
3
4
5
6
7
8
9
10
11
12
13
14
15
16
17
18
19
20
21
22
23
24
25
26
27
28
@RestController
@RequestMapping("/caches")
class CacheController(
    private val cacheManager: CacheManager
) {
    @GetMapping("/local/stats")
    fun getCacheStats(): List<NamedCacheStat> {
        return cacheManager.cacheNames.mapNotNull { cacheName ->
            val cache = cacheManager.getCache(cacheName) ?: return@mapNotNull null
            val nativeCache = cache.nativeCache

            if (nativeCache is com.github.benmanes.caffeine.cache.Cache<*, *>) {
                val stats = nativeCache.stats()
                NamedCacheStat(
                    name = cacheName,
                    stats = CacheStat(
                        hitCount = stats.hitCount(),
                        missCount = stats.missCount(),
                        hitRate = stats.hitRate(),
                        evictionCount = stats.evictionCount(),
                        loadSuccessCount = stats.loadSuccessCount(),
                        loadFailureCount = stats.loadFailureCount()
                    )
                )
            } else null
        }
    }
}
global cache
다음은 springboot에서 Redis를 활용하여 global cache를 구현한 sample입니다.
kotlin, springboot3.x기준으로 설명합니다.
전체 sample은 github-sample를 참조해주세요.
gradle
spring cache 및 redis를 gradle에 로드합니다.
1
2
implementation("org.springframework.boot:spring-boot-starter-cache")
    implementation("org.springframework.boot:spring-boot-starter-data-redis")
CacheConfig
Spring에서 사용할 CacheManager에 RedisCacheManager를 적용합니다.
@EnableCaching를 붙혀줌으로써 springcache를 활성화해줍니다.
1
2
3
4
5
6
7
8
9
10
11
12
13
14
15
16
17
18
19
20
21
22
23
24
25
26
27
28
29
30
31
32
33
34
35
36
37
38
39
40
41
42
43
44
45
46
import com.fasterxml.jackson.datatype.jsr310.JavaTimeModule
import com.fasterxml.jackson.module.kotlin.KotlinModule
import com.fasterxml.jackson.module.kotlin.jacksonObjectMapper
import org.springframework.cache.CacheManager
import org.springframework.cache.annotation.EnableCaching
import org.springframework.context.annotation.Bean
import org.springframework.context.annotation.Configuration
import org.springframework.data.redis.cache.RedisCacheConfiguration
import org.springframework.data.redis.cache.RedisCacheManager
import org.springframework.data.redis.connection.RedisConnectionFactory
import org.springframework.data.redis.serializer.GenericJackson2JsonRedisSerializer
import org.springframework.data.redis.serializer.Jackson2JsonRedisSerializer
import org.springframework.data.redis.serializer.RedisSerializationContext
import org.springframework.data.redis.serializer.StringRedisSerializer
import java.time.Duration

@Configuration
@EnableCaching
class CacheConfig {

    @Bean
    fun cacheManager(redisConnectionFactory: RedisConnectionFactory): CacheManager {

        val config = RedisCacheConfiguration.defaultCacheConfig()
            .entryTtl(Duration.ofSeconds(10))
            .disableCachingNullValues()
            .serializeKeysWith(
                RedisSerializationContext.SerializationPair.fromSerializer(StringRedisSerializer())
            )
            .serializeValuesWith(
                RedisSerializationContext.SerializationPair.fromSerializer(
                    GenericJackson2JsonRedisSerializer() // class명까지 데이터가 들어감을 주의
//                    {
//                        "product": {
//                        "product::2": "{\"@class\":\"com.example.globalcacheexample.domain.product.service.ProductInfo\",\"name\":\"A\",\"price\":[\"java.math.BigDecimal\",1.00]}"
//                    }
//                    }
                )
            )

        return RedisCacheManager.builder(redisConnectionFactory)
            .cacheDefaults(config)
            .build()
    }

}
RedisTemplateConfig
redis connection을 위한 RedisTemplateConfig을 지정합니다.
1
2
3
4
5
6
7
8
9
10
11
12
13
14
15
16
17
18
19
20
21
22
23
24
25
26
27
28
@Configuration
class RedisTemplateConfig(
    @Value("\${spring.data.redis.host}") private val redisHost: String,
    @Value("\${spring.data.redis.port}") private val redisPort: Int,
) {
    @Bean
    fun redisConnectionFactory(): RedisConnectionFactory {
        return LettuceConnectionFactory(redisHost, redisPort)
    }

    @Bean
    fun redisTemplate(): RedisTemplate<String, Any> {
        val redisTemplate = RedisTemplate<String, Any>()
        redisTemplate.connectionFactory = redisConnectionFactory()
        redisTemplate.isEnableDefaultSerializer = false
        redisTemplate.keySerializer = StringRedisSerializer()
        redisTemplate.valueSerializer = StringRedisSerializer()
        redisTemplate.hashKeySerializer = StringRedisSerializer()
        redisTemplate.hashValueSerializer = StringRedisSerializer()

        return redisTemplate
    }

    @Bean
    fun stringRedisTemplate(connectionFactory: RedisConnectionFactory): StringRedisTemplate {
        return StringRedisTemplate(connectionFactory)
    }
}
@Cacheable 적용
local cache와 마찬가지로 @Cacheable은 메서드 실행 결과를 캐시 저장소에 저장해두고, 같은 파라미터로 다시 호출될 경우, 메서드를 실행하지 않고 캐시된 결과를 반환해주는 기능을 제공합니다.
1
2
3
4
5
6
@Cacheable(cacheNames = ["productByName"], key = "#name")
fun getProductsByName(name: String): List<ProductInfo> {
    println("db 조회 getProductsByName")
    val products = productRepository.getProductsByName(name).orEmpty()
    return products.map { it.toInfo() }
}
cacheNames: 사용할 캐시 이름을 지정합니다.- 여기서는 productByName이라는 이름의 캐시 공간을 사용합니다.
- CacheManager에서 productByName이라는 이름으로 캐시를 관리합니다.
key: 캐시 저장 시 사용할 키 값을 지정합니다.- 여기서는 #name을 키로 사용합니다.
- 즉, 메서드 파라미터 name의 값을 기반으로 캐시합니다.
데이터는 아래와 같은 형식으로 저장되어 확인 가능합니다.
1
2
3
4
127.0.0.1:6379> keys *
1) "products:name:A"
127.0.0.1:6379> get products:name:A
"[{\"name\":\"A\",\"price\":1.00},{\"name\":\"A\",\"price\":1.00}]"
hybrid cache
다음은 springboot에서 CaffeineCache와 Redis를 활용하여 hybrid cache를 구현한 sample입니다.
kotlin, springboot3.x기준으로 설명합니다.
전체 sample은 github-sample를 참조해주세요.
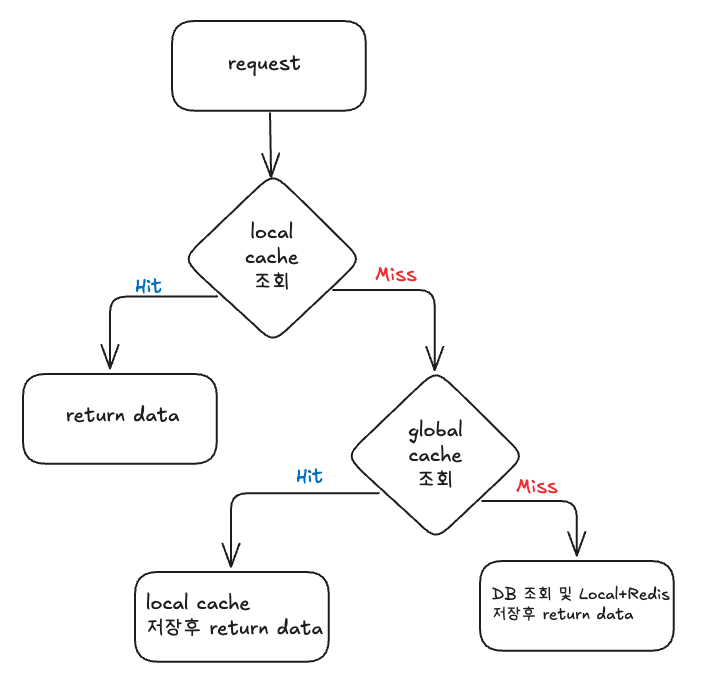
흐름도
대용량 트래픽 환경에서는 읽기 성능 최적화와 데이터 일관성을 모두 고려해야 합니다. 이번 플로우(Local → Redis → DB → 저장) 설계는 이런 요구를 충족시키기 위해 다음과 같은 이유로 구성되었습니다.
- Local Cache -> Hit 시 바로 반환
- Miss 시 Redis Cache 조회
- Redis Hit 시 Local에 채워넣고 반환
- Redis Miss시 DB 조회 후 Local, Redis에 데이터 채워넣고 반환
- Put/Evict/Clear는 둘 다 동시 적용
위의 흐름에서 중요한 포인트를 3가지 다시 정리해보았습니다.
1. Local Cache 우선 조회: 최단 경로로 빠른 응답
- 목적: 트래픽이 몰려도 서버 인메모리(Caffeine)에서 바로 반환하여 최소 레이턴시 보장
- 장점: 네트워크 비용(예: Redis 왕복 요청) 없이 데이터를 가져올 수 있어 서버 부하를 극단적으로 줄임
- 결과: 자주 조회되는 데이터는 거의 모든 요청을 Local Cache에서 처리 → 극대화된 성능 개선
정리: “가장 빠른 레이어를 먼저 사용하자”는 캐시 계층화 기본 원칙을 따랐습니다.
2. Local Miss 시 Redis 조회: 메모리 한계를 넘는 확장성 확보
- 목적: 서버 인메모리(Local Cache)는 저장 용량이 제한되어 있음 → 오래 사용되지 않은 데이터는 퇴출될 수 있음
- 보완책: Local에 없는 데이터는 중앙 저장소(Redis)에서 조회하여 지속적으로 데이터 접근성을 보장
- 장점:
- 서버 리소스 한계(메모리 크기)를 초과하는 데이터를 Redis가 커버
- 여러 서버 간 데이터 일관성을 Redis를 통해 유지 가능
- 추가 효과: Redis Hit 시 Local Cache를 자동으로 Warm-up하여 다음 요청을 최적화
정리: “메모리 크기의 한계를 넘어 확장성 확보”를 위한 Redis 보조 계층 추가하였습니다.
3. Put/Evict 시 Local + Redis 동시에 적용: 데이터 일관성 보장
- 목적: 데이터가 수정되거나 삭제될 때 Local만 갱신하거나 Redis만 갱신하면 불일치 문제가 발생할 수 있음
- 방식: 저장(Put), 삭제(Evict), 초기화(Clear) 모두 Local과 Redis 양쪽을 동시에 업데이트하여 데이터 일관성을 유지
- 장점:
- “읽기는 빠르게, 변경은 신중하게”를 따르는 안전한 캐시 운영
- 예상치 못한 오래된 데이터 제공을 막음
- 롤백 처리: Redis 저장 실패 시 Local 저장도 롤백하여 트랜잭션적 안정성 확보
정리: “양쪽 일관성 확보 없이는 캐시 신뢰도가 떨어진다”는 점을 고려해야합니다.
hybrid cache의 가장 중요한 점은 읽기는 빠르고 가볍게 (Local → Redis → DB),
저장/삭제는 신중하고 일관성 있게 (Local + Redis 동시 적용)
서버 자원은 효율적으로 쓰고
장애 상황에도 신뢰할 수 있게 설계해야합니다.
cache config
CaffeineCacheManager와 RedisCacheManager를 등록합니다. 위의 local cahce, global cache 설정 과정과 유사합니다.
1
2
3
4
5
6
7
8
9
10
11
12
13
14
15
16
17
18
19
20
21
22
23
24
25
26
27
28
29
30
31
32
33
34
35
36
37
38
39
40
41
42
43
44
45
46
47
48
49
50
51
52
53
54
55
56
57
58
59
60
61
62
63
64
65
66
67
68
69
@Configuration
//@EnableCaching
class CacheConfig {

    @Bean
    fun caffeineCacheManager(): CaffeineCacheManager {
        val manager = CaffeineCacheManager()
        manager.setCaffeine(
            Caffeine.newBuilder()
                .expireAfterWrite(10, TimeUnit.MINUTES)
                .maximumSize(1000)
        )
        return manager
    }

    @Bean
    fun redisObjectMapper(): ObjectMapper {
        return ObjectMapper().apply {
            // 타입 정보 비활성화
            deactivateDefaultTyping()

            // 추가 설정들
            configure(DeserializationFeature.FAIL_ON_UNKNOWN_PROPERTIES, false)
            configure(SerializationFeature.WRITE_DATES_AS_TIMESTAMPS, false)
        }

    }

    @Bean
    fun redisCacheManager(
        redisConnectionFactory: RedisConnectionFactory,
        redisObjectMapper: ObjectMapper
    ): RedisCacheManager {
        return RedisCacheManager.builder(redisConnectionFactory)
            .cacheDefaults(
                RedisCacheConfiguration.defaultCacheConfig()
                    .entryTtl(Duration.ofMinutes(30))
                    .serializeKeysWith(
                        RedisSerializationContext.SerializationPair.fromSerializer(StringRedisSerializer())
                    )
                    .serializeValuesWith(
                        RedisSerializationContext.SerializationPair.fromSerializer(
                            GenericJackson2JsonRedisSerializer(redisObjectMapper)
                        )
                    )
            )
            .build()
    }

    @Bean
    fun redisTemplate(
        redisConnectionFactory: RedisConnectionFactory,
        redisObjectMapper: ObjectMapper
    ): RedisTemplate<String, Any> {
        val template = RedisTemplate<String, Any>()
        template.connectionFactory = redisConnectionFactory

        val keySerializer = StringRedisSerializer()
        val valueSerializer = Jackson2JsonRedisSerializer(redisObjectMapper, Any::class.java)

        template.keySerializer = keySerializer
        template.valueSerializer = valueSerializer
        template.hashKeySerializer = keySerializer
        template.hashValueSerializer = valueSerializer

        template.afterPropertiesSet()
        return template
    }
}
HybridCacheService
hybrid cache concept을 구현한 서비스 계층을 만들어서, 밖에서 사용하기 쉽게 만듭니다.
저는 캐시 만료에 대해서 캐시를 “지우기” (삭제)로 선택하였습니다. 데이터 일관성을 보장할 수 있지만 성능에 약간의 부담이 있을 수 있습니다. 또한 캐시스템피드 현상이 발생할 수 있습니다. 데이터 변경이 자주 발생하고, 정확한 데이터 일관성이 중요한 경우에 사용하기 좋습니다.
반면 캐시 갱신을 원한다면, 성능상 이점은 있지만, 데이터가 불일치 상태일 가능성도 있습니다. 데이터의 변경 빈도가 낮고, 효율성이 더 중요한 경우에 사용해볼 수 있습니다.
1
2
3
4
5
6
7
8
9
10
11
12
13
14
15
16
17
18
19
20
21
22
23
24
25
26
27
28
29
30
31
32
33
34
35
36
37
38
39
40
41
42
43
44
45
46
47
48
49
50
51
52
53
54
55
56
57
58
59
60
61
62
63
64
65
66
67
68
@Component
class HybridCacheService(
    private val caffeineCacheManager: CaffeineCacheManager,
    private val redisTemplate: RedisTemplate<String, Any>,
    private val redisObjectMapper: ObjectMapper,
) {

    fun <T> get(key: String, typeReference: TypeReference<T>, loader: () -> T): T {
        val caffeineCache = caffeineCacheManager.getCache(key)

        // 1. 로컬(Caffeine) 캐시 조회
        val localCacheValue = caffeineCache?.get(key)?.get()

        if (localCacheValue != null) {
            return redisObjectMapper.convertValue(localCacheValue, typeReference)
        }


        // 2. 로컬에 없으면 Redis 조회
        val remoteCacheValue = redisTemplate.opsForValue().get(key)
        if (remoteCacheValue != null) {
            val jsonString = redisObjectMapper.writeValueAsString(remoteCacheValue)
            val value = redisObjectMapper.readValue(jsonString, typeReference)
            caffeineCache?.put(key, value)
            return value
        }


        // 3. 둘 다 없으면 loader 호출 (DB 조회 등)하고 저장
        val loaded = loader()
        save(key, loaded as Serializable)
        return loaded
    }

    fun <T : Serializable> save(key: String, value: T) {
        try {
            val caffeineCache = caffeineCacheManager.getCache(key)
                ?: throw CacheException("Caffeine cache not found")

            // 트랜잭션적 접근
            try {
                caffeineCache.put(key, value) // local cache save

                redisTemplate.opsForValue().set(key, value, Duration.ofHours(1)) // global cache save & TTL 설정
            } catch (e: Exception) {
                // 롤백: Caffeine에서 제거
                caffeineCache.evict(key)
                throw CacheException("Failed to save to cache", e)
            }
        } catch (e: Exception) {
            throw CacheException("Cache operation failed", e)
        }
    }

    fun evict(key: String) {
        // 캐시를 "지우기" (삭제)
        // 데이터 일관성을 보장할 수 있지만 성능에 약간의 부담이 있을 수 있습니다.
        // 데이터 변경이 자주 발생하고, 정확한 데이터 일관성이 중요한 경우
        val caffeineCache = caffeineCacheManager.getCache(key)
        caffeineCache?.evict(key)
        redisTemplate.delete(key)

        // 만약 갱신을 원한다면, 아래와 같이 갱신도 가능
        // 성능상 이점은 있지만, 데이터가 불일치 상태일 가능성도 있습니다.
        // 데이터의 변경 빈도가 낮고, 효율성이 더 중요한 경우에 사용
        // save(key, loaded) // 이 방법은 데이터 갱신이 필요할 때 사용
    }
}
usage
cache key와 TypeReference를 사용하여 캐시에서 데이터를 가져옵니다.
1
2
3
4
5
6
7
8
fun getProductsByName(name: String): List<ProductInfo> {
    val cacheKey = "products:name:$name"
    return hybridCacheService.get(cacheKey, typeReference = object : TypeReference<List<ProductInfo>>() {}) {
        println("DB 조회 - getProductsByName($name)")
        val products = productRepository.getProductsByName(name).orEmpty()
        products.map { it.toInfo() }
    }
}
고려사항
- 환경별로 캐시 evict시 삭제할 것인지 갱신할 것인지에 대한 고민.
- 서버 재기동 후 캐시 초기화 문제
- 캐시를 갱신할 때 두 군데(Local + Redis)를 꼭 같이 invalidate 해줘야 한다.
- 완벽한 일관성을 원하면 이 구조는 위험할 수 있다. (ex. 예약 시스템 등)
- Pub/Sub로 Local 캐시를 강제로 invalidate 하는 것도 고민해볼 만하다.
- Redis Keyspace Notification 활용해서 Local 캐시 자동 갱신
- Ehcache, Infinispan 같은 분산 캐시 솔루션도 한번 써보기
- Cache Aside 패턴 공부